floor restoration

Marble Mosaic Shower Tile Refresh Richmond After

Marble Mosaic Tiled Shower Cubicle Refreshed in Richmond

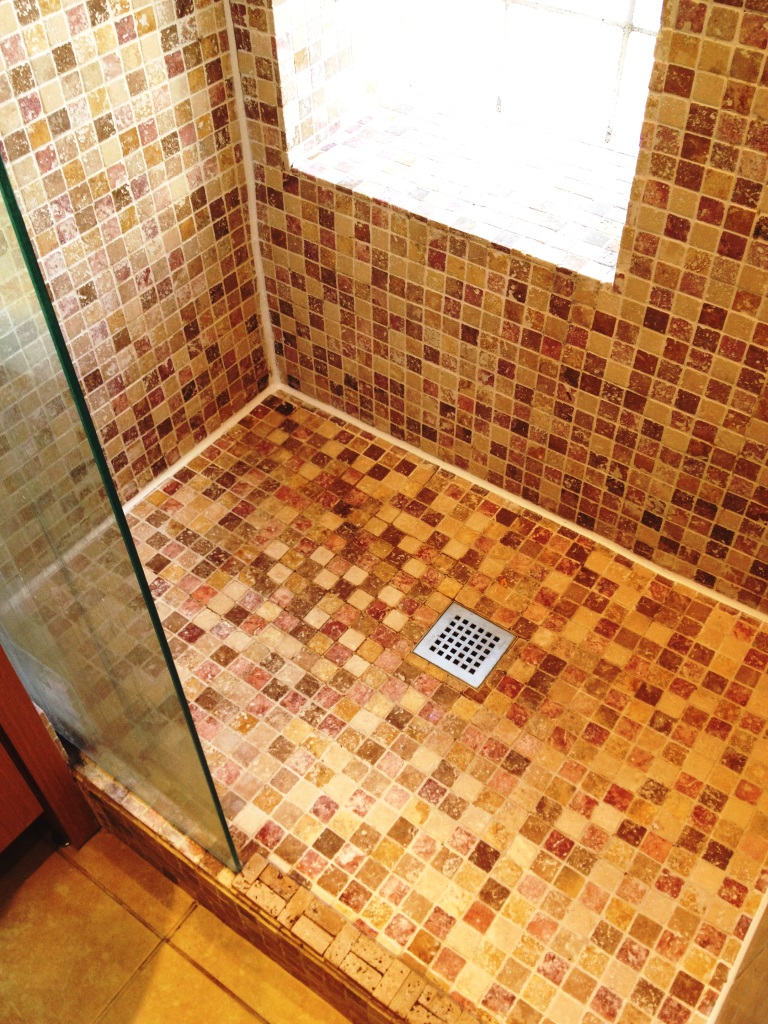
This Marble mosaic tiled shower cubicle in Richmond, Surrey was in need of a good clean, re-seal and re-silicone. Moisture had penetrated the old sealer and left mould and mildew in the pores of the tiles. This is quite a common problem in the modern insulated homes we live in today which invariably have in-sufficient ventilation. The silicone sealant around the base of the shower had also perished allowing water in behind the tiles around the base.

Marble Mosaic Shower Tile Refresh Richmond Before

Cleaning Marble Mosaic Tiles and Grout

We first stripped away all of the old silicone and proceeded to clean the tile and grout by scrubbing in a dilution of Tile Doctor Remove and Go, which is a strong coatings remover that shifts just about anything but is also safe to use on tile, stone and grout. This did the trick and resulted in what was left of the old sealer being removed and had the added bonus of cleaning the grime away from the Marble tiles.

Sealing Marble Mosaic Tiles

The bathroom was allowed to dry out for a period of 2 days so as not to trap any moisture behind the new sealer. Then once dry we applied two coats of Tile Doctor Colour Grow which is a solvent based sealer that reaches deep into the pores of the stone preventing other contaminates from becoming ingrained in the tile.

The final step was to applying a new silicone sealant to the joints and as you can see from the pictures the Marble tiles responded very well to the process and the shower now looks much fresher if not a new installation.

Marble Mosaic Shower Tile Refresh Richmond After
 

Refreshing a Marble Tiled Shower Cubicle in Middlesex

Marble Mosaic Tiled Shower Cubicle Refreshed in Richmond Read More »

Edwardian tiled floor Richmond after cleaning

Edwardian Tiled Hallway Cleaned and Sealed in Richmond

This Edwardian tiled stone floor was installed in the hallway of a house in Richmond, Surrey. It had not been deep cleaned for a number of years and a number of layers of old sealer were visible causing a yellowing of the tile. The old sealant needed to be stripped off before cleaning could take place and leave the Edwardian floor in a state ready to receive a new seal.

Edwardian tiled floor Richmond before cleaning

Cleaning Edwardian Tiles

To remove the old sealer a dilution of Tile Doctor Remove and Go which is a solvent based stripper was applied to the floor, left to dwell for a while and then steamed into the tile which helps to break up the old sealers. The tiles were then scrubbed using a rotary machine and a dilution of Tile Doctor Pro-Clean which is a strong alkaline product and the residue pressure rinsed away. The soiled residue was then removed using a wet vacuum and the floor rinsed thoroughly.

Sealing Edwardian Tiles

After leaving the Edwardian floor for 24 hours to dry, we then applied seven coats of Tile Doctor Seal and Go topical sealer. This not only gives the floor a high level of protection but it also enhances the contrast of the tiles and gives a nice shine,

Edwardian tiled floor Richmond after cleaning
Hopefully you can appreciate the difference from the photographs and how the appearance of the tiles now looks much fresher.

<h

Edwardian Tiled Hallway Cleaned and Sealed in Richmond Read More »

Travertine Tiled Kitchen Ottershaw After Cleaning

Travertine Kitchen Floor Cleaning in Ottershaw

This Travertine tiled kitchen floor in Ottershaw, Surrey, was in need of a deep clean, strip out the old sealer and re-seal to ensure easy maintenance in the future. Being a high traffic area the tiles had accumulated a high amount of soil over the years. There was also marking from breakfast stools which are visible in the picture.

Travertine Tiled Kitchen Ottershaw Before Cleaning Travertine Tiled Kitchen Ottershaw Before Cleaning

Firstly, I rotary machine scrubbed the floor using Tile Doctor Pro-Clean high alkaline cleaner. This broke down the soil and released it along with the remaining old sealer which was then pressure rinsed to ensure all of the dirt was removed from the pores. Following this, I used diamond encrusted burnishing pads to cut back through the stone and remove the marks from the chairs and fine scratches. After restoring the surface to a satin finish with the finer pads, the floor was left to dry out.

Cleaning Travertine Tiles

I gave the floor a scrub with Tile Doctor Pro-Clean which is a strong alkaline tile cleaning product safe to use on Tile, Stone and Grout, this was mopped onto the floor and then scrubbed in using a rotary machine; grout lines were done by hand using a stiff scrubbing brush.

Travertine Tiled Kitchen Ottershaw Before Cleaning
This broke down the soil releasing it along with the old sealer and the tiles then pressure rinsed to ensure all the dirt was removed from the pores of the tile.

Travertine Tiled Kitchen Ottershaw During Cleaning Travertine Tiled Kitchen Ottershaw During Cleaning

In order to remove stubborn marks, fine scratches and finish the floor was cut back and re-polished using a set of diamond abrasive burnishing pads fitted to a heavy rotary machine. You start with the coarse pad which cuts through the stone and removes any remaining old sealer and soil and then smooth off the surface ready to receive a new seal using the medium, fine and extra fine pads until a highly polished finish is achieved.

Sealing Travertine Tiles

The floor was then left for twenty four hours to allow it to dry and then I returned to seal the Travertine and Grout using two coats of Tile Doctor Colour Grow. This is an impregnating sealer that repels liquid and soil so contaminates cannot become ingrained in the stone making it easier to clean in the future. As you can see from the pictures, it transformed the look of the floor and brightened up the kitchen.

Travertine Tiled Kitchen Ottershaw After Cleaning Travertine Tiled Kitchen Ottershaw After Cleaning


Deep cleaning travertine tiles in Ottershaw

Travertine Kitchen Floor Cleaning in Ottershaw Read More »

Limestone Kitchen floor cleaned in Hampton After

Limestone Kitchen Floor Cleaning in Hampton

This Limestone tiled kitchen floor in Hampton, Middlesex, was proving troublesome to keep clean and was now in need of a deep clean and re-seal to ensure easy maintenance in the future. Being a high traffic area the tile and grout had accumulated a high amount of soil over the years and the tiles had lost their shine due to wear on the face of the stone.

Limestone Kitchen floor cleaned in Hampton Before

Cleaning Limestone Tiles

I gave the floor a quick wash down with a dilution of Tile Doctor Pro-Clean to ensure we had removed any surface soil and grit and then proceeded to burnish the Limestone tiles using a set of diamond abrasive burnishing pads fitted to a heavy rotary machine. You start with the coarse pad which cuts through the stone and removes any remaining old sealer and soil and then smooth off the surface ready to receive a new seal using the medium, fine and extra fine pads until a highly polished finish is achieved.

The grout lines were then scrubbed by hand using more Tile Doctor Pro-Clean and a fair amount of elbow grease; the whole floor was then washed down with the water being removed from the floor using a wet vacuum.

Sealing Limestone Tiles

The floor was then left for twenty four hours to allow it to dry and then I returned to seal the Limestone and Grout using two coats of Tile Doctor Colour Grow. This is an impregnating sealer that occupies the pores in the stone so contaminates cannot become ingrained in the stone making it easier to clean in the future. Hopefully you can appreciate from the pictures how transformed the kitchen now looks.

Limestone Kitchen floor cleaned in Hampton After
 

Maintaining Limestone Tiles in Middlesex

Limestone Kitchen Floor Cleaning in Hampton Read More »

Victorian Hallway Hampton Court After Sealing

Victorian Tiled Hallway Floor Stripped and Sealed in Hampton Court

This was a straight forward strip and re-seal of a Victorian tiled hallway floor at a residence near the historic Hampton. The floor I suspect was an original feature of the house and the owners had maintained it well but like any Victorian floor they will show the effects of wear especially in high traffic areas like a hallway and benefit from a good deep clean and reseal every few years.

Victorian Hallway Hampton Court Before

Cleaning Victorian Tiles

The floor was washed down in a strong dilution of Tile Doctor Pro-Clean which is a multi-purpose alkaline cleaner/stripper which is safe to use on tile, stone and grout. This was left to soak into the floor tile for about twenty minutes before scrubbing it deep into the tile using a rotary floor machine fitted with a black scrubbing pad. This did a great job of cleaning up the floor and removing what was left of the previous sealer. The soiled solution was removed with a wet vacuum and then washed down with clean water to remove any remaining product and neutralise the floor before sealing. There were a few stubborn areas that needed further attention and so I treated them with neat Pro-Clean and a steamer until I was satisfied it was a good I could get it, again once I had finished I gave the floor a good rinse with clean water.

Victorian Hallway Hampton Court After Cleaning

Sealing Victorian Tiles

I left the floor to dry overnight and came back the next day to seal the tiles which for Victorian tiles I usually use Tile Doctor Seal and Go. It’s a water based sealer so it leaves no smell add a nice shiny finish to the floor, six coats were require in the end which is not unusual for Terracotta due to the porosity of the tiles.

Victorian Hallway Hampton Court After Sealing
 

Restoring Victorian Tiles in Middlesex

Victorian Tiled Hallway Floor Stripped and Sealed in Hampton Court Read More »

Terracotta Kitchen Floor Twickenham After Cleaning

Terracotta Kitchen Floor Deep Cleaned in Twickenham

This Terracotta tiled kitchen floor in Twickenham had accumulated a high amount of soil over the years. Spots and spills from kitchen activity had also proved impossible to remove by the owner which was due to the sealer breaking down; the floor was now in need of a deep clean, stripping off the old sealer and then re-sealing to ensure easy maintenance in the future.

Terracotta Kitchen Floor Twickenham Before Cleaning

Cleaning Terracotta Tiles

The first step was to use a rotary scrubbing machine together with Tile Doctor Pro-Clean which is a high alkaline cleaner for use with tile and stone. This action breaks down the soil in the tile and releases it along with the remaining old sealer. The floor was then pressure rinsed to ensure all of the dirt was removed from the pores of the tile and grout lines scrubbed by hand with a stiff brush. Once I was happy the floor was clean it was given a thorough rinse to remove any remaining chemical and left it to dry.

Terracotta Kitchen Floor Twickenham During Cleaning

Sealing Terracotta Tiles

The floor was left to dry for a period of twenty four hours before sealing which was done by applying five coats of Tile Doctor Seal and Go. This is a water based topical sealer that leaves no smell and will repel liquid and soil allowing the tile to keep its appearance and making it easier to maintain in the future. The sealer also gives a high sheen finish which reflects the light and enhances the colours of the stone. As you can see from the pictures, the restored floor brought the kitchen back to life and made the room look brighter.

Terracotta Kitchen Floor Twickenham After Cleaning Terracotta Kitchen Floor Twickenham After Cleaning


Terracotta Kitchen Floor Tiles Deep Cleaned and Sealed in Middlesex

Terracotta Kitchen Floor Deep Cleaned in Twickenham Read More »

Victorian Hallway and Kitchen in Teddington After Cleaning

Victorian Tiled Kitchen and Hallway Floor Deep Cleaned in Teddington

This Victorian tiled hallway and kitchen floor in Teddington, Middlesex, was in need of a deep clean including stripping out the old sealer and re-sealing to ensure easy maintenance in the future. Being a high traffic area the tiles had accumulated a high amount of soil over the years, there was also a lot of glue that had been used to stick carpet down in the past which had to be removed and there was heavy staining to the kitchen tiles from spillages over the years. If that wasn’t bad enough the owners of the house were in the middle of renovating the property so there was paint and plaster on the surface which would also need to be treated prior to sealing.


Victorian Hallway and Kitchen in Teddington Before Cleaning Victorian Hallway and Kitchen in Teddington Before Cleaning

Cleaning Victorian Tiles

In order to break down the glue and paint the affected areas were sprayed with Tile Doctor Remove and Go which was then left to soak in. Following 10 minutes dwell time I then proceeded to scrub off the glue and paint and the resulting soiled solution was rinsed away.

The next step was to scrub the entire tiled floor using a rotary machine fitted with a scrubbing pad and a strong dilution of Tile Doctor Pro-Clean high alkaline cleaner. This broke down the soil ingrained in the tile and released it along with the remaining old sealer; the floor was then pressure rinsed to ensure all of the dirt was removed from the pores and stubborn areas re-treated.

Sealing Victorian Tiles

The floor was then left alone to dry for twenty four hours before I came back to seal it for which I used four coats of Tile Doctor Seal and Go. This is a water based topical sealer that leaves no smell and provides a nice sheen to the floor; it will also repel liquids and dirt making it easier to maintain the tiles in the future.


Victorian Hallway and Kitchen in Teddington After Cleaning Victorian Hallway and Kitchen in Teddington After Cleaning

You can see from the photographs how the sealer has gives a high sheen finish to the tile which reflects the light and enhances the colours of the stone leaving the floor looking as good as new and very vibrant.

Restoring Victorian Tiles in Middlesex

Victorian Tiled Kitchen and Hallway Floor Deep Cleaned in Teddington Read More »

Porcelain Tiled Floor in Hampton Acid Scrubbed

Removing Grout Haze from semi porous Porcelain Tiles in Hampton

This Porcelain tiled floor was located in Hampton, Middlesex. The floor had been newly laid a year ago and had not been sealed. The Porcelain was of the semi porous variety and this type of Porcelain needs to be sealed to maintain its appearance and make maintenance easier. To make things worse the tiler had left a lot of grout residue on the surface of the tile which made the tile rougher, trapping the dirt and making it difficult to clean effectively.

Cleaning Porcelain Tile and Grout

To remove the grout haze it was necessary to give the tile and wash with an acid product known as Tile Doctor Grout Clean-up, which is very effective at removing grout haze. Working in sections the product was diluted and then applied to the floor letting it soak in for a short while before being scrubbed in with a scrubbing pad fitted to a rotary machine. This action had the added bonus of cleaning the floor but you do have to be careful with acids no to leave them on the tile too long.

Porcelain Tiled Floor in Hampton Acid Scrubbed
The soiled solution was removed using a wet vacuum and the tile rinsed down with clean water. This process was repeated until I was satisfied the tile and grout was clear of grout residue.

Sealing Semi-Porous Porcelain Tiles

After allowing the floor to dry for 24 hours, we returned to seal the tiles with Tile Doctor Ultra-Seal which is a solvent based impregnating sealer that’s ideally suited for semi porous Porcelain and provides a natural look.

I took the photograph above between sections so you could see the difference between the before and after and I think you will agree the treated tiles look much cleaner.

Porcelain Tiles Cleaned and Sealed in Hampton

Removing Grout Haze from semi porous Porcelain Tiles in Hampton Read More »

Edwardian Hallway Floor Teddington after cleaning

Cleaning an Edwardian Hallway Floor in Teddington

This Edwardian period tiled hallway floor at a house in Teddington, Middlesex was in need of a deep clean and removal of paint marks following a year of building work.

Cleaning Edwardian Tiles

Initially the floor was cleaned using a medium dilution of Tile Doctor Pro-Clean which is a strong alkaline cleaning agent; it’s applied with a mop and left it to soak into the floor for five minutes before being scrubbed into the tile with a rotary scrubbing machine fitted with a scrubbing pad. Pro-Clean was also used along the grout joints but scrubbed in with stiff brush by hand. The soil was then washed off and removed with a wet vacuum. Whilst this process did clean up the tile and grout it didn’t remove the paint marks so the next step was to target those area’s with Tile Doctor Remove and Go which is a coatings remover and as its name suggests is good at removing pretty much anything. Once the floor was clean it was thoroughly washed down with clean water partly to remove any further soil but also to remove any trace of cleaning products before sealing, again the wet vacuum was used to remove the liquids and get the floor as dry as possible before leaving for the day.

Edwardian Hallway Floor Teddington before cleaning

Sealing Victorian Tiles

The next day the floor had dried so I proceeded to seal the tile with four coats of Tile Doctor Seal and Go which is the recommended sealer for Victorian Tile, providing good stain protection whilst adding a nice sheen to the surface bringing out the colour in the tile.

Edwardian Hallway Floor Teddington after cleaning
We service Teddington and the surrounding areas for all types of natural and man-made stone flooring, please get in touch for a free quotation.

Maintaining Edwardian Tiles in Middlesex

Cleaning an Edwardian Hallway Floor in Teddington Read More »

Scroll to Top